OpenWRT Customization Part 1
In my travels, I have used OpenWRT in several capacities:
- Virtual Firewall (x86_64 VM protecting my home network from my lab network)
- A VERY inexpensive Wifi-Pineapple Clone
- Raspberry-Pi OpenWRT Access Points
- VPN Gateways
While OpenWRT is generally awesome out of the box, sometimes it’s necessary to customize a firmware image to enhance the functionality further or to create a base image for automated deployments. This guide should be able to be adapted to any platform supported by OpenWRT as well as adding other packages.
Requirements
We will be building a firmware image from source. We’ll need:
- Build Environment - For making awesome OpenWRT firmware
- Time - Building the first image with the toolchain may take as little as a few minutes to a couple of hours, depending on your build machine and the options chosen for your custom firmware
- Disk Space - 8GB of storage
- Internet connection - to download source packages for building the custom firmware
Disclaimer
- Your warranty will almost certainly be voided by installing a non-manufacturers firmware on your device (exceptions are Raspberry Pi’s and virtual machines, amongst others)
#include <std/disclaimer.h>
Hardware Info
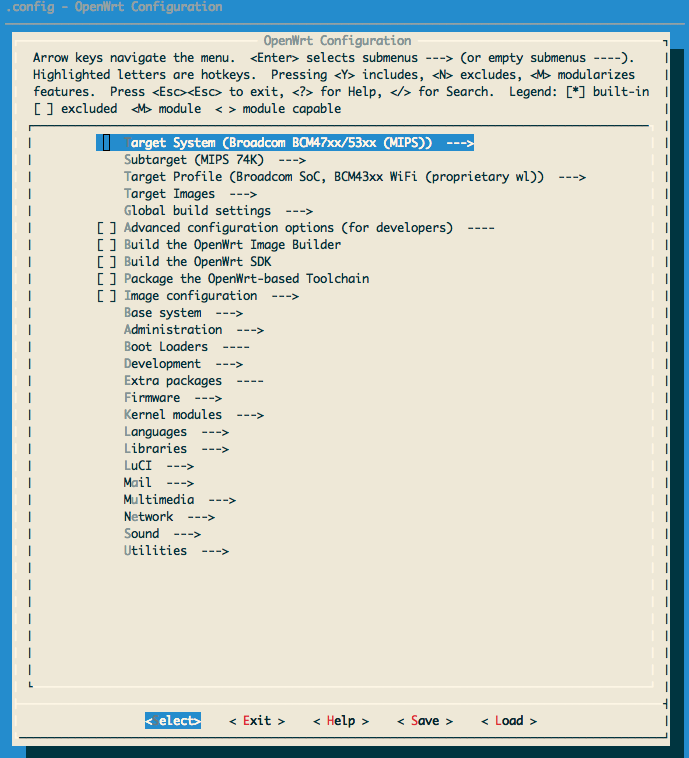
I have a couple of Asus RT-N16 devices as access points around my house and wanted to put a custom firmware with the tools and features that I wanted.
The Asus RT-N16 uses a Broadcom BCM4716 SOC with a MIPS 74Kc V4.0 CPU. These details will be needed for the custom build process.
Pre-Install
Make a backup of the configuration if needed. The pre-install instructions will work from both a stock or other firmware image. I used the TFTP install method after a 30-30-30 reset with a base install While the router was rebooting with new firmware (don’t panic if it takes 5 minutes for the router to come back after the 30-30-30 reset), I began setting up the OpenWRT build environment
DUO
We’ll be customizing our firmware to include the DUO Security multi-factor authentication platform. DUO has a push based authentication as well as SMS and OTP code authentication support. DUO is currently free for less than 10 users and augments authentication methods such as Linux PAM, LDAP/Active Directory, and Windows RDP. We will be using their OpenVPN plugin to add multifactor authentication to our OpenWRT based OpenVPN setup.
Firmware Driver Choices
I chose to use proprietary wl driver for 802.11N speeds and working VAP (virtual access points - for guest networks etc.) If proper 802.11N speeds and VAP support are not needed, the Open Source driver (enabled by default) will work.
Secondary firmware install with DUO MFA
Summarized from the OpenWRT Build Guide:
mkdir /data/openwrt/
cd /data/openwrt/
git init
git remote add -t chaos_calmer openwrt https://github.com/openwrt/openwrt.git
git pull openwrt
Now we have a pristine build environment for the chaos_calmer branch of the OpenWRT git repository. We will be using the menuconfig setup option for building our custom firmware. The interface is a ncurses based TUI with arrow based navigation.
mkdir package/network/services/duo
(cd package/network/services/duo ; wget https://raw.githubusercontent.com/jbeley/packages/master/net/duo/Makefile )
./scripts/feeds update -a
./scripts/feeds install -a
Until I get the pull request for OpenVPN accepted, the sed command is necessary to allow the duo plugin to be loaded into OpenVPN. The makefile from my GitHub repository should be able to be adapted to virtually any project hosted at GitHub with a “simple” build/install process.
sed -i s/--disable-plugins/--enable-plugins/ package/network/services/openvpn/Makefile
make menuconfig
make V=sDependencies for DUO enabled OpenVPN are below.
| Dependency | Note | Location |
|---|---|---|
| duo | plugin for duo MFA. All other dependencies will be added automatically | Network |
| openssl | SSL library | Libraries/SSL |
| luci | OpenWRT configuration web interface - is not included by default in custom builds | Luci |
First build will take a LONG time to build as the cross compiler tools must be built. Binaries for the target devices will be generated using the cross compiler. Subsequent builds for the same build profiles should be much quicker. The “V=s” option indicates that the standard output and errors from the build process will be displayed on the terminal. It’s a good idea to run this process inside of GNU screen or byobu in case of network issues.
After the build process, I used the sysupgrade method to install my new custom firmware on my device after having scp’d the firmware to my running router:
scp openwrt-brcm47xx-mips74k-asus-rt-n16-squashfs.trx root@192.168.1.1:/tmp/
ssh root@192.168.1.1 sysupgrade -i
/tmp/openwrt-brcm47xx-mips74k-asus-rt-n16-squashfs.trx
After the reboot (less than about a minute), I was able to login to my router and continue the configuration process.
Part two to follow.
TODO
- pull request for duo and openvpn changes
- add proper openssl dependency to Makefile